 Save
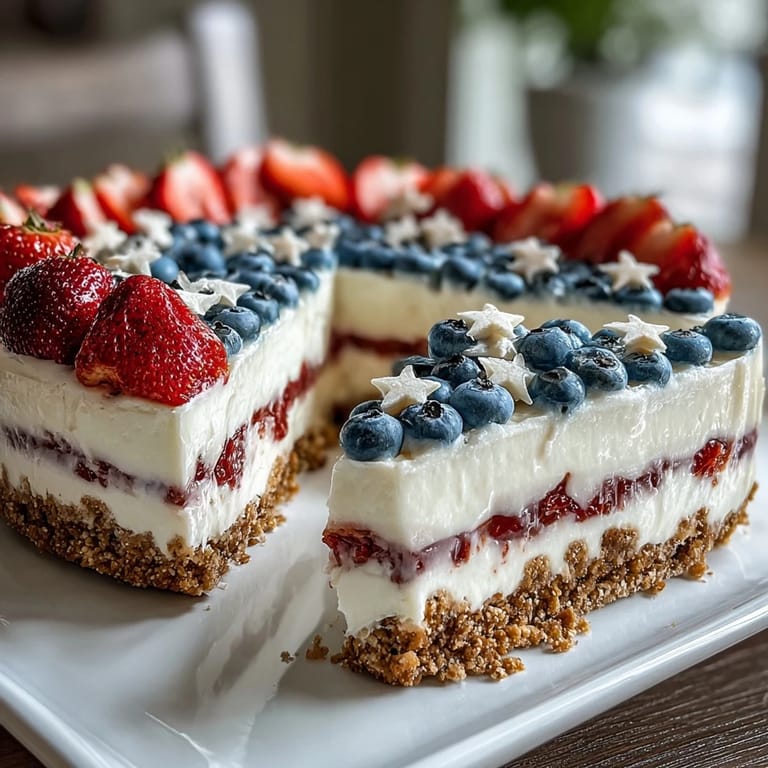
Save My neighbor texted me that Fourth of July morning with a photo of her kids in tiny Uncle Sam hats, asking if I could bring something patriotic to the block party. Standing in my kitchen with a carton of cream cheese warming on the counter, I suddenly realized: no baking required, just layers of creamy goodness topped with berries that would naturally form the flag. The idea felt almost too simple, but by evening, watching everyone gather around this dessert like it was some kind of edible artwork, I knew I'd stumbled onto something special.
I'll never forget my brother-in-law's face when he saw it—he actually stopped mid-conversation to photograph it from three different angles. What made me laugh was realizing this dessert works because it's both stunning and genuinely delicious, not one of those situations where something looks pretty but tastes like cardboard. That night, people kept coming back for seconds, and I found myself answering the same question over and over: "No, I didn't use food coloring. Those are just berries."
Ingredients
- Graham cracker crumbs: They form the foundation, and using fresh crackers (not stale ones you've had sitting around) makes a real difference in texture—aim for crumbs that are fairly uniform in size.
- Unsalted butter, melted: This is your binding agent, and melting it first ensures it coats every crumb evenly without hot spots.
- Granulated sugar: Just a small amount adds subtle sweetness to the crust layer without overpowering.
- Cream cheese, softened: Let this sit at room temperature for at least 30 minutes—cold cream cheese lumps and doesn't blend smoothly, which affects your final texture.
- Heavy whipping cream, cold: Keep your mixing bowl and whisk chilled too; cold cream whips faster and holds its shape longer.
- Powdered sugar: This dissolves seamlessly into the filling, unlike granulated sugar which might feel gritty.
- Vanilla extract: A small amount brightens the filling without making it taste like vanilla cake.
- Fresh blueberries: Pat them dry before arranging so they don't weep moisture onto the filling.
- Fresh strawberries: Hull and slice them right before assembly to keep them from turning brown or releasing too much juice.
Tired of Takeout? 🥡
Get 10 meals you can make faster than delivery arrives. Seriously.
One email. No spam. Unsubscribe anytime.
Instructions
- Build Your Foundation:
- Mix graham cracker crumbs with melted butter, sugar, and salt until everything is evenly moistened—it should feel like damp sand, not wet paste. Press it firmly into your baking dish, creating an even, compact layer that won't crumble when the creamy filling lands on top.
- Chill While You Prep:
- Pop the crust in the fridge while you work on the filling; this helps it stay intact and gives you a solid base to work with.
- Cream the Foundation:
- Beat your softened cream cheese until it's completely smooth and fluffy, scraping the bowl occasionally to catch any stubborn lumps hiding at the bottom. This takes about 2-3 minutes and is worth the effort.
- Sweeten and Flavor:
- Add powdered sugar, vanilla, and lemon zest (if using), beating until fully incorporated; the mixture should look pale and creamy, not grainy.
- Fold in the Clouds:
- Whip your cold cream in a separate chilled bowl until stiff peaks form, then gently fold it into the cream cheese mixture with a spatula using slow, careful strokes. Stop as soon as no white streaks remain—overworking deflates all that air you just created.
- Spread and Smooth:
- Pour the filling over your chilled crust and smooth the top with an offset spatula or the back of a spoon, creating an even surface. Take your time here because this is your canvas for the flag design.
- Paint With Berries:
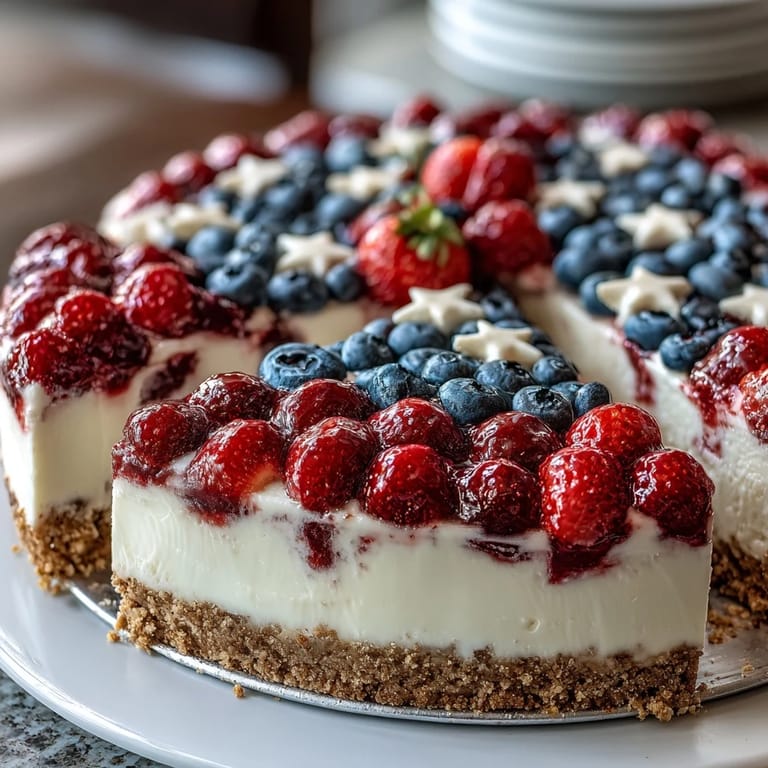
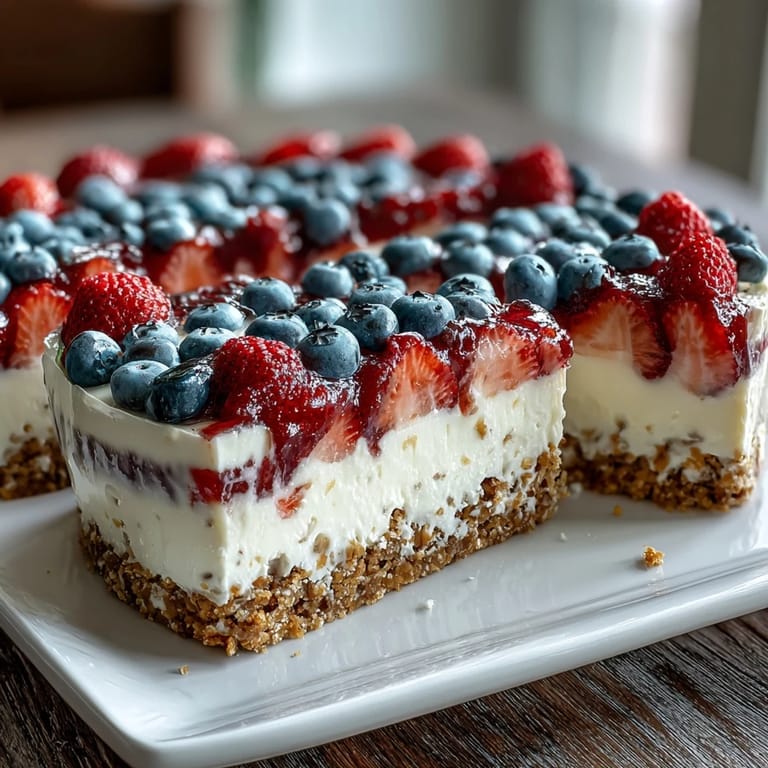
- Arrange blueberries in the upper left corner (about a 4-by-3-inch rectangle), then create alternating horizontal rows of strawberry slices and plain filling across the rest, mimicking the flag's red and white stripes. If you want extra definition, pipe whipped cream between the rows.
- Chill Until Set:
- Cover the dish and refrigerate for at least 4 hours (or overnight); the filling will transform from soft to sliceable during this time.
- Serve Fresh:
- Cut into squares and serve straight from the fridge, where it stays perfectly creamy and cool.
 Save
Save There's something oddly moving about a dessert that doubles as a symbol—everyone understood what they were looking at immediately, and somehow that made it taste better. I realized that day that food becomes memorable not just because it's delicious, but because it carries meaning and creates a moment people want to be part of.
Make-Ahead Magic
You can absolutely prepare this cake a full day in advance, which makes it perfect for busy holiday planning. Just keep it covered in the refrigerator, and add your berries no more than an hour before serving—the fresh arrangement looks vibrant and the berries won't have time to release excess moisture or discolor the filling. If you're bringing it to a potluck, assemble it at home, transport it in the baking dish, and skip the berries until you arrive; this way it travels safely and looks freshly made when it's revealed.
Flavor Variations Worth Trying
While the classic berry version is stunning, I've experimented with swaps that keep the patriotic look while adding different taste dimensions. Raspberries in place of strawberries create a deeper, more burgundy stripe that's visually striking and slightly more tart. Blackberries offer an almost jewel-like quality and pair beautifully with the cream cheese base, though they're softer and require gentler handling.
Storage and Serving Tips
This dessert is built to stay refrigerated, and honestly, it's better that way—the filling slices cleanly and tastes properly chilled. Keep it covered for up to three days, though the crust can absorb moisture over time, so plan to serve it within 24-48 hours for the best texture contrast between crisp crust and creamy filling.
- Transport the finished cake in its baking dish covered with plastic wrap if you're taking it somewhere; it holds together far better than if you try to slice and move individual pieces.
- If your cream cheese mixture seems too soft before chilling, pop the whole assembled cake in the freezer for 15 minutes to firm it up slightly before adding berries.
- For a gluten-free version, swap in gluten-free graham crackers and everything else stays exactly the same—your guests won't know the difference.
 Save
Save This cheesecake has a way of turning a simple outdoor gathering into something that feels intentional and festive. Once you make it, you'll understand why people keep asking for it every summer.
Recipe FAQs
- → How do I make the crust crunchy?
Ensure the melted butter fully coats the graham cracker crumbs and press firmly into the baking dish. Chilling helps it set into a firm, crunchy base.
- → Can I substitute the berries?
Yes, you can swap strawberries or raspberries for blackberries or other fresh berries for varied color and flavor.
- → What is the best way to achieve a smooth filling?
Beat the cream cheese until very smooth before folding in whipped cream gently to maintain lightness and avoid lumps.
- → How long should the cheesecake chill?
Refrigerate for at least 4 hours to ensure the filling firms up properly before serving.
- → Can this dessert be prepared ahead?
Yes, it can be made up to 24 hours in advance. Add fresh fruit just before serving for optimal freshness.