 Save
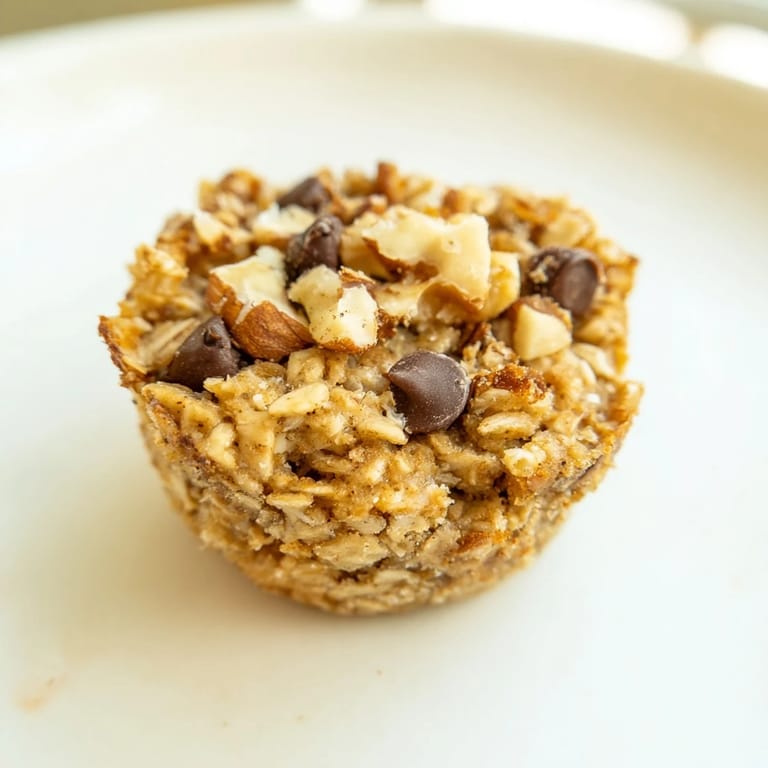
Save I discovered these baked oatmeal cups on a chaotic Tuesday morning when I was standing in front of my pantry, desperately needing breakfast I could grab without thinking. The viral TikTok version had been sitting in my saved folder for weeks, and something about the simplicity of baking oats in a muffin tin felt like a small act of self-care. Within an hour, my kitchen smelled like cinnamon and vanilla, and I had twelve little golden cups that solved my breakfast problem for the next week. It wasn't complicated or fancy, but it felt like the kind of thing a good friend would make for you.
The first time I brought these to a friend's house for a lazy weekend breakfast, I watched her bite into one still warm from the microwave and her eyes light up in that way that makes baking worth it. She asked if they were hard to make, and when I told her the truth—that you basically just mix two bowls and let the oven do the work—she demanded the recipe immediately. That moment made me realize these weren't just convenient; they were the kind of thing that makes people feel genuinely looked after.
Ingredients
- Old-fashioned rolled oats (2 cups): Use certified gluten-free oats if that matters to you; they keep the cups chewy and substantial without being dense.
- Light brown sugar (1/2 cup, packed): It adds sweetness and moisture that keeps these tender through the week.
- Baking powder (1 tsp): This is what gives them their gentle rise and keeps them from being gluey.
- Ground cinnamon (1/2 tsp): Warm spice that makes the whole thing feel like comfort, not just breakfast.
- Salt (1/4 tsp): Never skip this; it balances everything and makes the flavors actually pop.
- Large eggs (2): These bind everything together and make the texture fluffy in the middle.
- Milk (1 1/4 cups): Dairy or unsweetened plant-based works equally well; it's just moisture.
- Unsweetened applesauce (1/4 cup): This keeps things tender and adds a subtle sweetness that lets other flavors shine.
- Melted coconut oil or unsalted butter (1/4 cup): Coconut oil gives a slight richness, butter tastes more indulgent; either works beautifully.
- Pure vanilla extract (1 tsp): Get pure, not imitation; the difference is honestly noticeable when you taste it plain.
- Optional mix-ins (up to 1 cup total): Fresh berries, chocolate chips, nuts, dried fruit—whatever makes you happy.
Tired of Takeout? 🥡
Get 10 meals you can make faster than delivery arrives. Seriously.
One email. No spam. Unsubscribe anytime.
Instructions
- Set your stage:
- Preheat the oven to 350°F and prepare your muffin tin with paper liners or a quick spray of nonstick oil. This takes thirty seconds and changes everything about cleanup later.
- Mix the dry team:
- Whisk together the oats, brown sugar, baking powder, cinnamon, and salt in a large bowl until everything is evenly distributed and you don't see any clumps of brown sugar hiding. This is where the magic of even texture starts.
- Whisk the wet ingredients:
- In a separate bowl, whisk the eggs, milk, applesauce, melted oil or butter, and vanilla until it's completely smooth and pale. Don't rush this; proper whisking makes the batter lighter.
- Bring them together:
- Pour the wet mixture into the dry ingredients and stir gently but thoroughly until just combined. You want no streaks of dry oats, but don't overmix or you'll lose that tender crumb.
- Add your personality:
- Fold in whatever mix-ins you've chosen, being gentle so berries don't bleed into the batter and chocolate chips stay whole. This is where you make them yours.
- Fill each cup:
- Divide the batter evenly among the muffin cups, filling each nearly to the rim. I use a cookie scoop for consistency, but a spoon works just fine.
- Bake until golden:
- Pop them in the oven for 23 to 27 minutes, until the tops are golden brown and feel set when you gently press them. Your kitchen will smell incredible.
- Cool with patience:
- Let them sit in the pan for 5 minutes, then turn them out onto a wire rack to cool completely. This prevents them from staying too moist on the bottom.
 Save
Save There's something genuinely satisfying about opening your fridge on a hectic morning and seeing twelve perfect little breakfasts staring back at you. These oatmeal cups transformed my mornings from stressed to somehow manageable, which is maybe the most underrated thing food can do.
Storage and Make-Ahead Magic
These live beautifully in an airtight container in the fridge for up to five days, which means you can genuinely make them on Sunday and eat well all week without thinking. If you want to freeze them, wrap each cup individually and stash them in the freezer for up to two months; just thaw overnight in the fridge or microwave for ninety seconds until warm. A brief microwave warm-up before eating makes them taste freshly baked even days later, which feels like a small miracle when you're rushing out the door.
Customization and Flavor Adventures
The beauty of these oatmeal cups is that once you make the base recipe once, you understand the structure well enough to play around confidently. I've experimented with adding nutmeg or cardamom for a more complex spice situation, swapping the brown sugar for maple syrup, and even throwing in shredded coconut and macadamia nuts for a tropical moment. The wet-to-dry ratio stays the same, so you can really only fail if you overthink it.
Making Them Work for Every Diet
For a vegan version, use flax eggs (two tablespoons ground flaxseed mixed with five tablespoons water, left to sit for five minutes) instead of regular eggs, swap the milk for any unsweetened plant-based option, and use coconut oil instead of butter. Everything else stays exactly the same, and honestly, they're just as wonderful. If gluten matters to you, certified gluten-free oats work perfectly and bake at the exact same temperature and time.
- Always double-check that your mix-ins are actually gluten-free if that's a concern for you or someone eating them.
- If you're making these for someone with multiple restrictions, batch them separately so there's no cross-contamination or mix-up.
- These freeze so beautifully that making extra batches with different fillings for different people becomes actually manageable.
 Save
Save These baked oatmeal cups became my answer to those mornings when I needed something that felt good without requiring much thought. They're proof that the best recipes are often the simplest ones.
Recipe FAQs
- → How do I keep the oatmeal cups moist?
Ensure not to overbake and include moist ingredients like applesauce and oil to maintain softness and chewiness.
- → Can I make these gluten-free?
Use certified gluten-free rolled oats to keep the cups gluten-free while maintaining their texture.
- → What mix-ins work best?
Fresh or frozen berries, chocolate chips, nuts, and dried fruits like cranberries or raisins add flavor and texture.
- → Can I prepare these ahead of time?
Yes, they store well in the fridge for up to 5 days or freeze for up to 2 months, ideal for meal prep.
- → How do I adapt the cups for a vegan diet?
Replace eggs with flax eggs (ground flaxseed and water) and use plant-based milk and oils for vegan-friendly cups.